When the life of the imaging unit expires totally
At this stage, the imaging unit needs to be replaced.
-
Open the side and front door.

-
Push down the lever and pull the corresponding toner cartridge out from the machine.
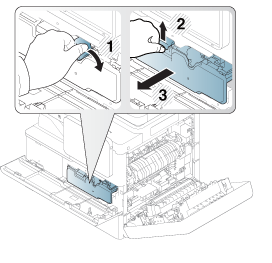
-
Open the inner cover and pull the corresponding imaging unit out from the machine.

-
Remove the new imaging unit from its package.

![[Caution]](../../common/icon_caution.png)
Do not use sharp objects, such as a knife or scissors, to open the imaging unit package. You could damage the surface of the imaging unit.
-
Remove the sheet protecting the surface of the imaging unit.

-
Remove the sealing tape.

-
Hold the handles on the new imaging unit, and push the imaging unit until it locks into place. Then, close the inner cover.

-
Hold the toner cartridge and align it with the corresponding slot inside the machine. Insert it back into its slot until locks in place.

-
Close the front door. Ensure that the door is securely closed.

![[Note]](../../common/icon_note.png)
If the front door is not completely closed, the machine will not operate.